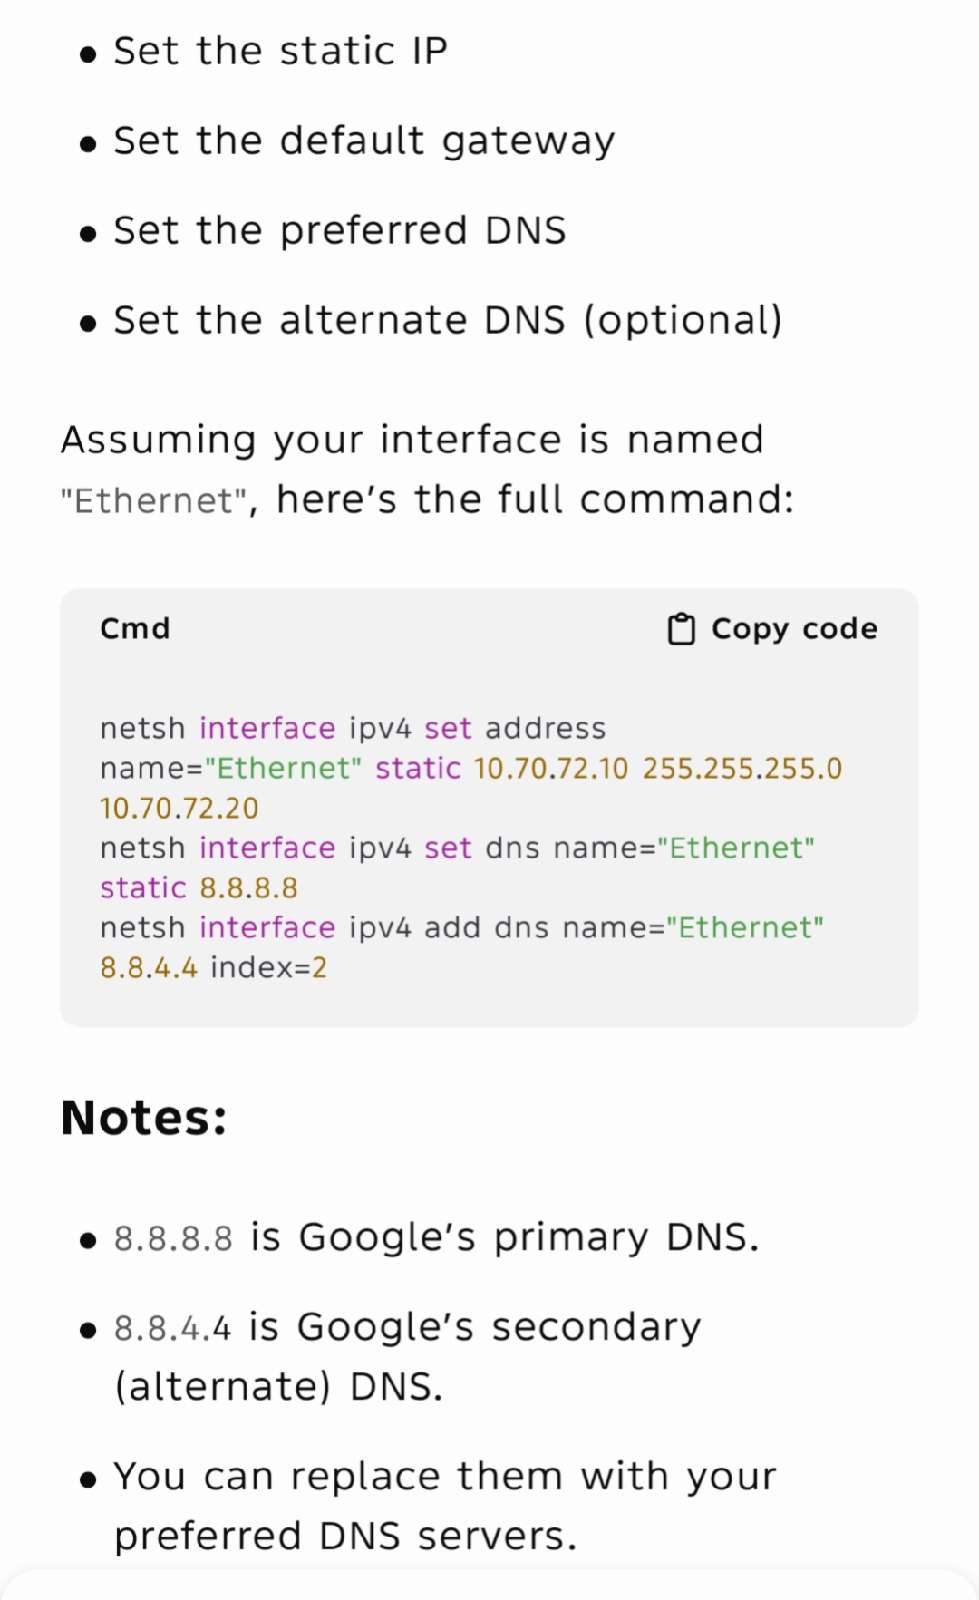
Computer Service Workshop
{/* Customer Data Entry */}
{/* Search Section */}
A PoE multiplexer, also known as a PoE splitter/multiplexer, is a device used to combine multiple PoE-enabled network connections into a single output, allowing for both power and data to be transmitted over a single Ethernet cable. This simplifies network setups, reduces cable clutter, and can lower installation costs by eliminating the need for separate power sources for multiple device


https://massgrave.dev/genuine-installation-media
Windows 10/11 enterprise edition
https://massgrave.dev/windows_ltsc_links
MS office instalation
https://gravesoft.dev/office_c2r_links
https://massgrave.dev/office_msi_links
https://filecr.com/windows/office-c2r-install/
Enterprise LTSC (Long-Term Servicing Channel) is a
long-term support variant of Windows 10 Enterprise, released every 2 to 3
years. Each release is supported with security updates for either 5 or 10 years
after its release, and intentionally receives no feature updates.
Microsoft releases Windows 10 and 11 through two
servicing channels.
GAC (General Availability Channel)
It is intended for both general and enterprise
customers.
Edition examples include options such as Home,
Pro, and Enterprise.
Maximum support on the same build is usually 2
years for consumers and 3 years for the enterprise. After that, you need to
install feature updates.
This is the main servicing channel and other
software and games usually follow this channel's life cycle to provide support.
LTSC (Long-Term Servicing Channel)
It is designed for devices where functionality and
features must remain constant over time, such as medical systems, industrial
controllers, and air traffic control devices.
Examples of editions include: Enterprise LTSC and
IoT Enterprise LTSC.
Maximum support on the same build is usually 5
years for LTSC and 10 years for the IoT LTSC.
This is not the main servicing channel and other
software and games usually don't follow this channel's life cycle. For example,
browsers and games might not provide support for 10 years on same build.
It lacks most of the Store (UWP) apps.
Reasons to use LTSC:
You don't like annual Windows feature upgrades.
You don't like preinstalled Store (UWP) apps as well.
You want longer update support for Windows 10.
Reasons to avoid using LTSC:
As stated above, many games and software might not support LTSC once that same build has reached the end of life in GAC.
Games might not work out of the box and you will manually need to install store and Xbox apps.
New hardware might not be fully supported by a 2-3 year-old LTSC build (A new version of LTSC is released every 3 years).
You might miss new features added in GAC that aren't available in LTSC.

After a Windows 11 update, shared
folders on a PC may become inaccessible due to changes in network discovery,
file sharing, or security settings.
Open Gpedit.msc
Local computer policy>Computer
Comfigration>Administrative Templates>Netwok>Lanman Server
Worksatation> Enable insecure guest logons
If it is Not- Configured
then Change it to Enable


Local computer policy>Computer
Configration>Security Setting>Local Policies>Security Options : Microsoft
network client: Digitally sign communications (always)


Using Regedit


a. On the Start Menu search, type gpedit and start
the Edit Group Policy app (i.e. Local Group Policy Editor). If you are using
Home edition, skip to step 8.
b. In the console tree, select Computer
Configuration > Windows Settings > Security Settings> Local Policies
> Security Options.
c. Double-click Microsoft network client: Digitally sign communications (always).
d. Select Disabled > OK.
If you're running Windows 11 Home edition,
the
guest fallback option is still enabled by default, so you're probably not
reading this blog post. But if for some reason it is on, or you need to turn
off SMB signing due to some third-party NAS, you will need to use PowerShell to
configure your machine because there is no gpedit tool by default. To do this:
a. On the Start Menu search, type powershell then
under the Windows PowerShell app, click Run as administrator. Accept the
elevation prompt.
b. To disable SMB signing requirement, type:
e. Hit enter, then hit Y to accept.
At this point you will be working if Signing or Guest were your real problems.
Important: we have not removed your ability to
enable SMB1. All editions of Windows 11 have SMB1 disabled by default - this
has been the case for over a year now and, in some editions, going back to
Windows 10 - but you are free to re-enable it if you have a third-party NAS
that only supports SMB1. SMB1 supports signing but your NAS may not, so the
steps above for disabling signing can still apply. SMB1 always allows guest
fallback and it cannot be stopped, so the guest steps are not applicable. If
your third-party NAS still requires SMB1, it's likely listed here
https://aka.ms/stillneedssmb1. If you find that it also doesn't support SMB
signing, please let us know with the email address below.
Creating a copy
of a physical hard drive (HDD), including its operating system (OS), to a
virtual hard drive (VHD) image involves several steps. You will essentially be
performing a disk cloning process that converts the contents of your physical
HDD into a virtual hard disk format. This allows you to run the OS and programs
from the virtual disk in a virtual machine (VM).
Here’s how you
can do it:
Requirements:
Steps to Create a Virtual HDD Image from a Physical HDD
1. Prepare the Tools
2. Clone the Physical HDD to an Image File
Example with Macrium Reflect:
3. Convert the Image to a Virtual HDD
If the cloning
software creates an image file (like .img), you can
convert it to a VHD or VDI format, which can be used by virtualization
software.
pgsql
Copy
VBoxManage convertfromraw /path/to/image.img /path/to/vm_disk.vdi
--format VDI
4. Create a Virtual Machine and Attach the Virtual HDD
Once you have
the virtual hard disk (VHD/VDI), you need to create a virtual machine and
attach the newly created virtual disk.
5. Adjust the Virtual Machine Settings
Depending on
the hardware and OS, the VM might not boot correctly right away. You may need
to make adjustments:
6. Boot the Virtual Machine
Once everything
is set up, start the virtual machine. The system should boot from the virtual
disk, and you should have access to the same OS and programs you had on the
physical machine, running in a virtualized environment.
Additional Notes:
Conclusion:
By using disk
cloning tools and virtualization software, you can successfully create a copy
of your physical HDD and boot it as a virtual machine. The key steps are
cloning the physical drive to an image, converting the image to a compatible
virtual disk format, and configuring the virtual machine to run from that disk.
By messaging ChatGPT, you agree to our Terms
and have read our Privacy Policy.
Don't share sensitive info. Chats may be reviewed and used to train our models.
Learn


